How to Host your Static Website on AWS with GitHub Actions
Build a full CI/CD Pipeline with Github Actions to Deploy your Static Website to AWS

Introduction
This post will guide you through the entire setup process of building a static website, pushing it to a GitHub repository, and using GitHub Actions to deploy your website to Amazon Web Services (AWS) to both serve and distribute your website across the world. ![]()
What is a Static Website?
A Static Website is a website that does not rely on a server to deliver dynamic information, all the data on the web page is delivered exactly as it is stored, examples of this type of website can include blogs, documentation, and guides.
- Introduction
- Getting Started
- Setting up AWS
- Setting up GitHub
Getting Started
Prerequisites
- An account on GitHub to store the repository of your website
- An account on AWS for hosting your website
Optional: A domain name for your website to sit on, as a prerequisite this will also be registered already with Route53 or already transferred to Route53. If you don’t have/want one you’ll need to rely on AWS’s CloudFront URLs e.g. d1234abcd.cloudfront.net if you want HTTPS with SSL certificates or the S3 bucket’s URL e.g. my-bucket.s3.eu-west-2.amazonaws.com if you’re happy with plain old HTTP.
What Services are we going to be using?
So, before we dive in, I’ve summarised some of the services we’re going to be using today, further on in this guide I’ll be describing what each service does for us as we go. ![]()
- GitHub Actions - To deploy the website to AWS
- AWS Simple Storage Service (S3) - To store your static website
- AWS CloudFront - To serve and distribute your static website
- AWS Route53 - To create DNS records to point to your static website
Building your Website
It’s all down to you on deciding how you’d like to generate your website, this website is generated using Jekyll and allows me to write content using Markdown however you could just as easily create your own website using pure HTML, CSS, and JS.
Whichever static site generator (or not) you choose to use, the steps in this guide should point you in the right direction and I’ll specify sections which you can skip if you’re going down the pure route. ![]()
GitHub
We’re going to start by creating a repository and pushing your website to GitHub, if this is your first time using Git, GitHub, or any source control system in the past then you can learn more about them from here.
Once you’ve got your repository set up and have pushed your website to GitHub, we can jump over to AWS to start setting up the infrastructure to host your website. Let’s make a start!
Setting up AWS
Creating an AWS IAM User for GitHub
Once you’ve created an account with AWS, and you’ve signed in, you’ll be presented with the AWS Management Console.
From here you’ll need to navigate to the Identity and Access Management (IAM) Dashboard, which can be found either by locating it on the page or by searching for IAM in the search bar as seen below:

The Identity and Access Management Dashboard is where you can manage all of the IAM users created in your AWS account.
Creating your IAM User
Firstly, you’re going to click on Users from the left-hand menu and you’ll be presented with the screen below.
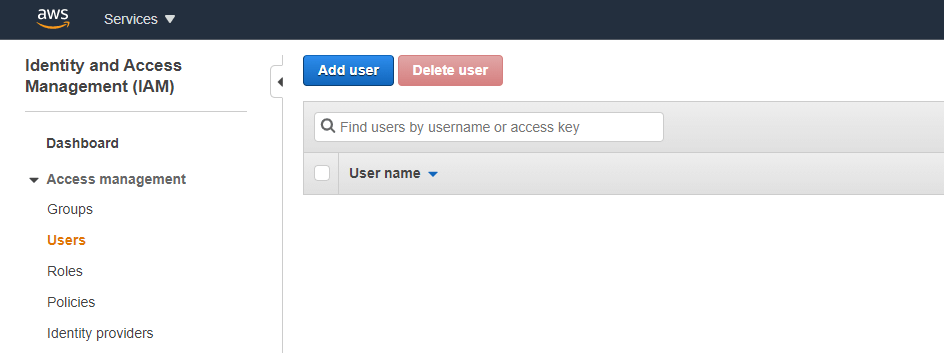
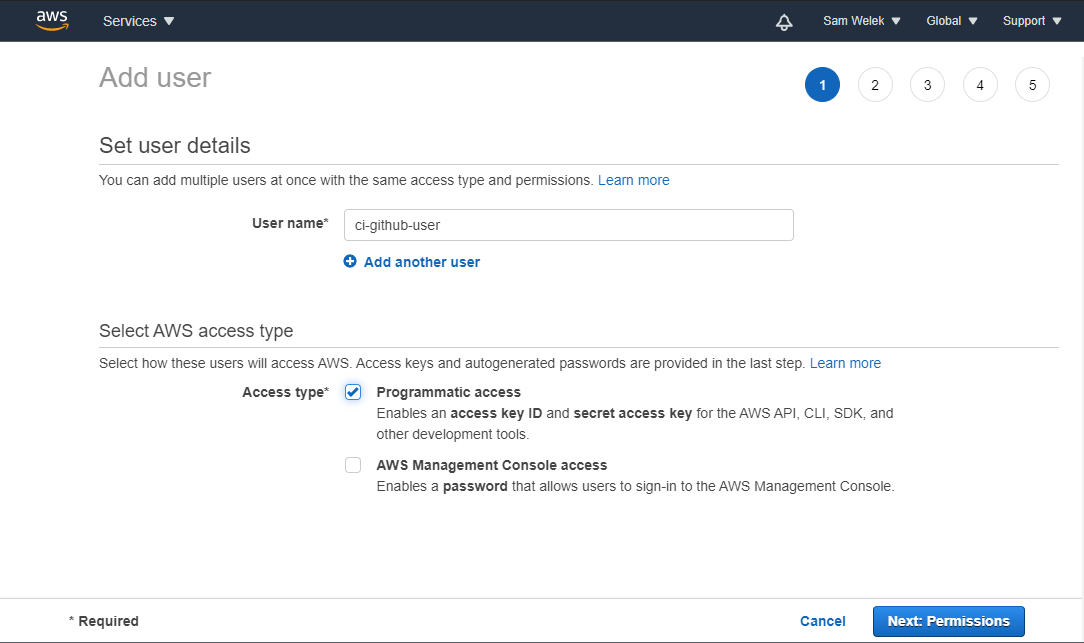
Click on Add user and fill in the User name of the user we’re creating for GitHub, for this example I’ve called it ci-github-user, and make sure to check the Programmatic Access checkbox as seen below:
On the next screen we’re going to specify the permissions this user will have. To do this, first you need to click on the Attach existing policies directly button on the top of the screen.

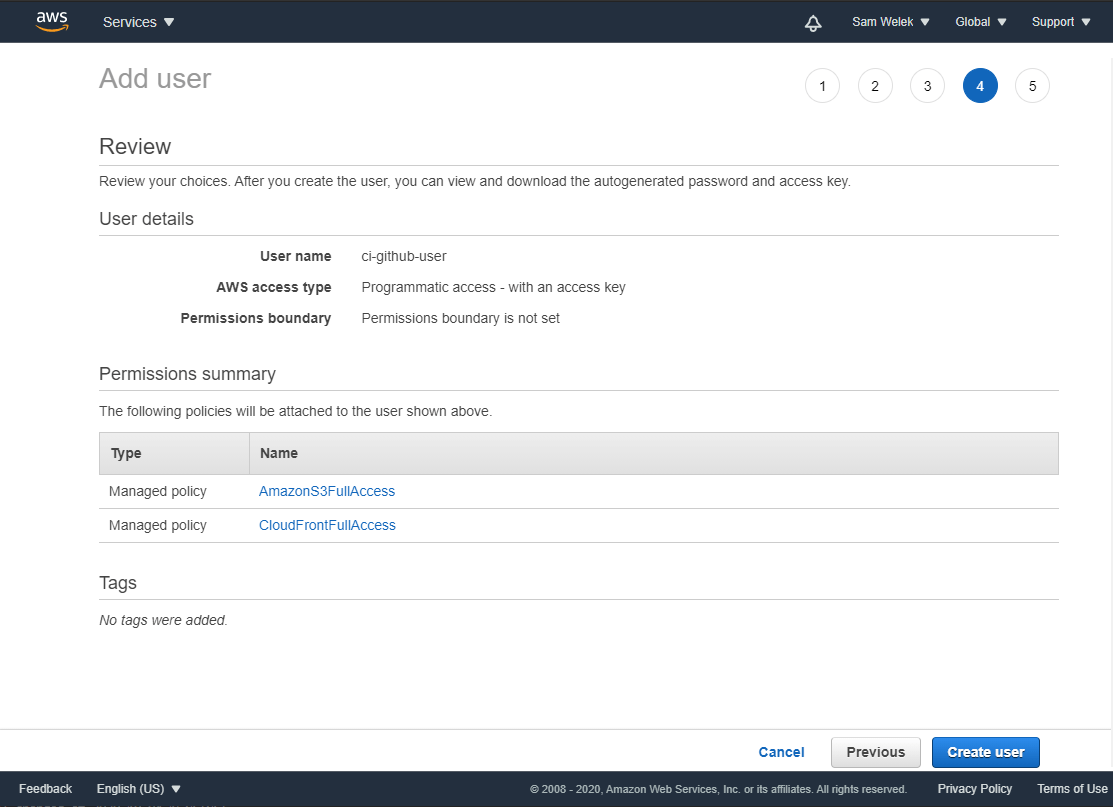
The table below shows the permissions we’re going to set for the user and discusses the purpose of each one with regards to your website.
| Permission Name | Purpose |
|---|---|
AmazonS3FullAccess |
Allows the user to write objects (the website) to S3. |
CloudFrontFullAccess |
Allows the user to create invalidations on CloudFront, this is going to be used to quickly update your content. Note see |
![]() Only the first 1000 invalidations per month are free, if you think you’re going to be uploading content more frequently than this then I’d recommend you create versioned file names for your website rather than creating invalidations each time, see AWS’s explanation on this.
Only the first 1000 invalidations per month are free, if you think you’re going to be uploading content more frequently than this then I’d recommend you create versioned file names for your website rather than creating invalidations each time, see AWS’s explanation on this.
The next step allows you to add tags to the user to make it easy to identify the user later on, I’ve chosen to skip this step in the example but you’re welcome to add any tags you want to.
Finally, you’ll be presented with a screen similar to the one below allowing you to review the user before it gets created, if everything looks okay click Create user.
After you create the user you’ll be presented with the user’s access_key and secret_access_key, take note of these as you’ll need them for GitHub later and you will not be able to see the secret_access_key again after leaving this page, this is how GitHub will log in as the user you’ve just created - for now though you’re done! ![]()
Creating an S3 Bucket
Next, we need an area to store your website that AWS will use to host your files from, for this we’re going to be using Amazon’s Simple Storage Service (S3).
Navigate to the S3 Dashboard by going back to the AWS Management Console and finding the S3 option or by searching for S3 on the search bar just as we did in the previous section.
Click on Create bucket and add the name of your website as the bucket’s name as seen below:
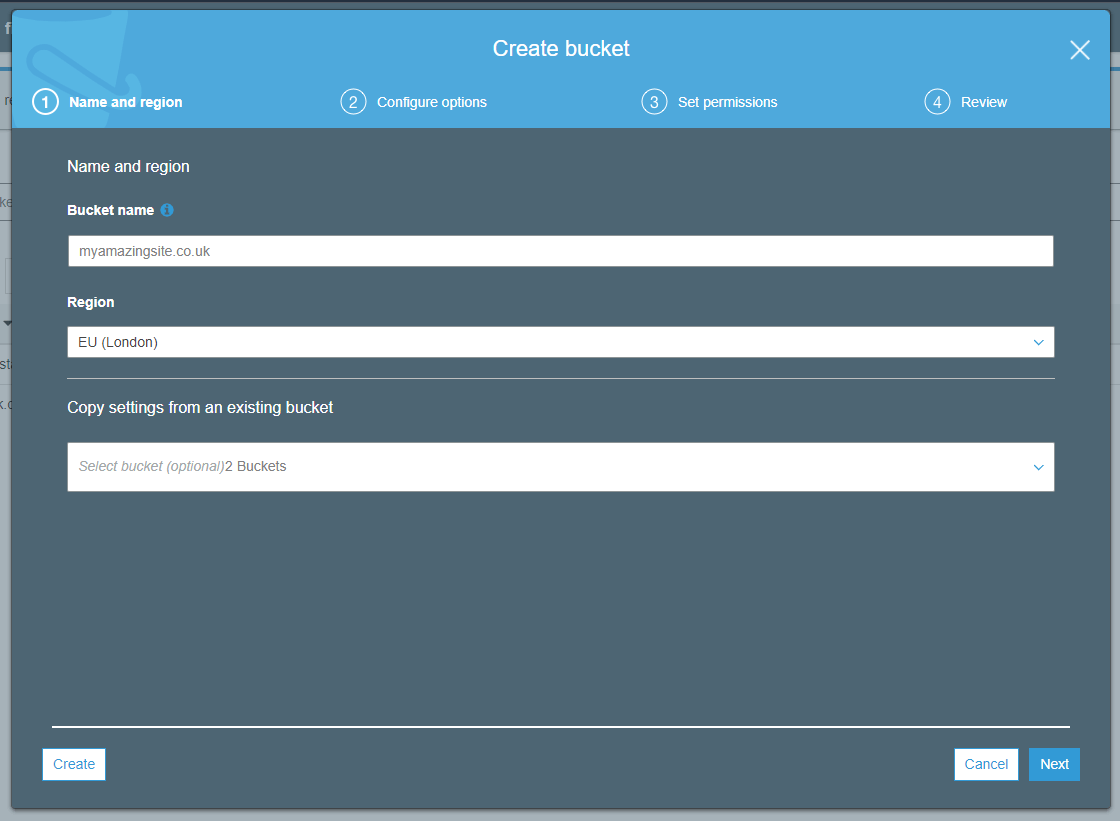
If you are going to be using a CloudFront Distribution then you can leave the default options set for this bucket and just click Next on the setup pages until you finish creating the bucket.
If you are not going to be using a CloudFront Distribution, then on Step 3: Set permissions un-check the top checkbox labelled Block all public access.
Setting your S3 Bucket up for Static Website Hosting
Now your bucket is all set up we need to turn static website hosting on, you can do this by first clicking on the name of your bucket from the S3 Dashboard and then navigating to the Properties tab.
From here, click on Static website hosting and select Use this bucket to host a website. You can also specify the default index document and error page here.
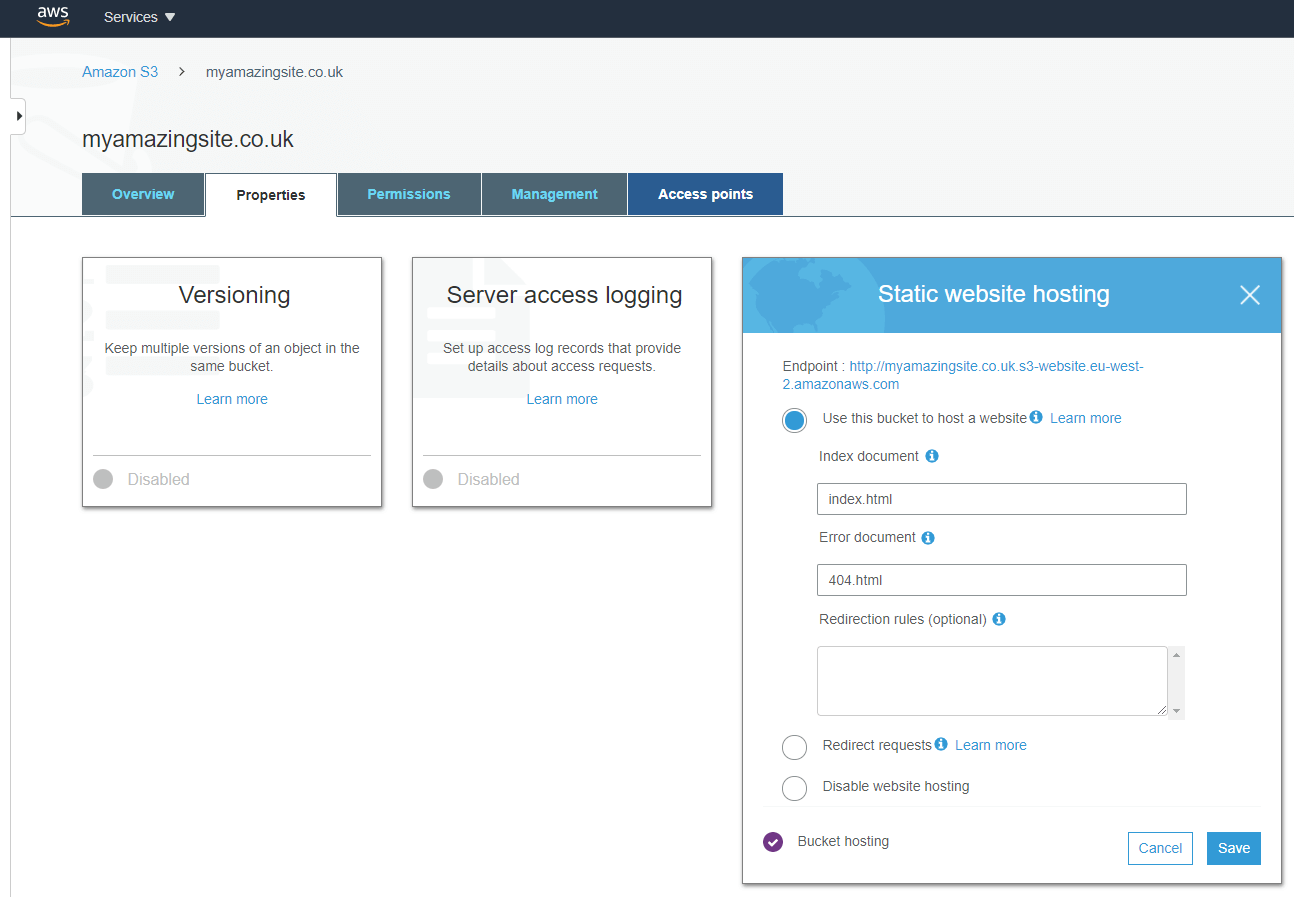
Take note of your bucket name and URL, we’ll be using it later on. Finally click Save and you’re done!
Creating a CloudFront Distribution
Now we’re going to set up a CloudFront Distribution that will allow you to use HTTPS with an SSL certificate.
Note: If you’re happy to serve your website with HTTP then you can skip this step and jump to Using Route53 to Point to your Domain and if you’re happy to not use your own domain either you can jump straight to Setting Up GitHub ![]()
Navigate to the CloudFront Dashboard by going back to the AWS Management Console and finding the CloudFront option or by searching for CloudFront on the search bar just as we did in the previous sections.
Next, click on Create Distribution and on the following screen click Get Started below the Web option.

After this, begin by clicking the Origin Domain Name box under Origin Settings, this will reveal a popup dropdown showing available resources, click on the S3 bucket entry you created in the previous step.

Next, select Yes for Restrict Bucket Access.
Under the Default Cache Behavior Settings section select Redirect HTTP to HTTPS.
Under the Distribution Settings we break off into two options; using a CloudFront URL or using a URL from your own domain.
Using a CloudFront URL
If you don’t have a domain name to use or you’re happy to use a d1234abcd.cloudfront.net URL then select the following option as seen below:

Finally, towards the bottom of the screen you can optionally specify the Default Root Object as index.html or whichever file should be used to enter your website. Then click Create Distribution - you’re done! Now let’s set up GitHub ![]()
Generating a Certificate and using your own Domain Name
If you want to use your own domain name then enter the CNAMEs of your website and select the following options as seen below:
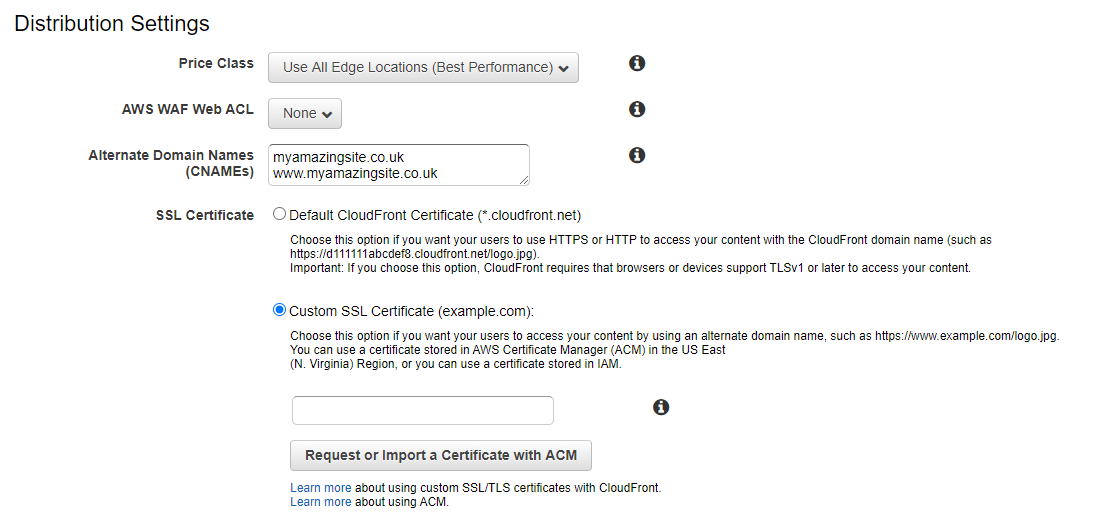
Now you’re going to want to create an SSL certificate so that we can use HTTPS, click the button entitled Request or Import a Certificate with ACM. This will take you to the AWS Certificate Manager.
From here you can enter your own domain name (or names if you want to cover multiple addresses with the same certificate) as seen in the screenshot below:
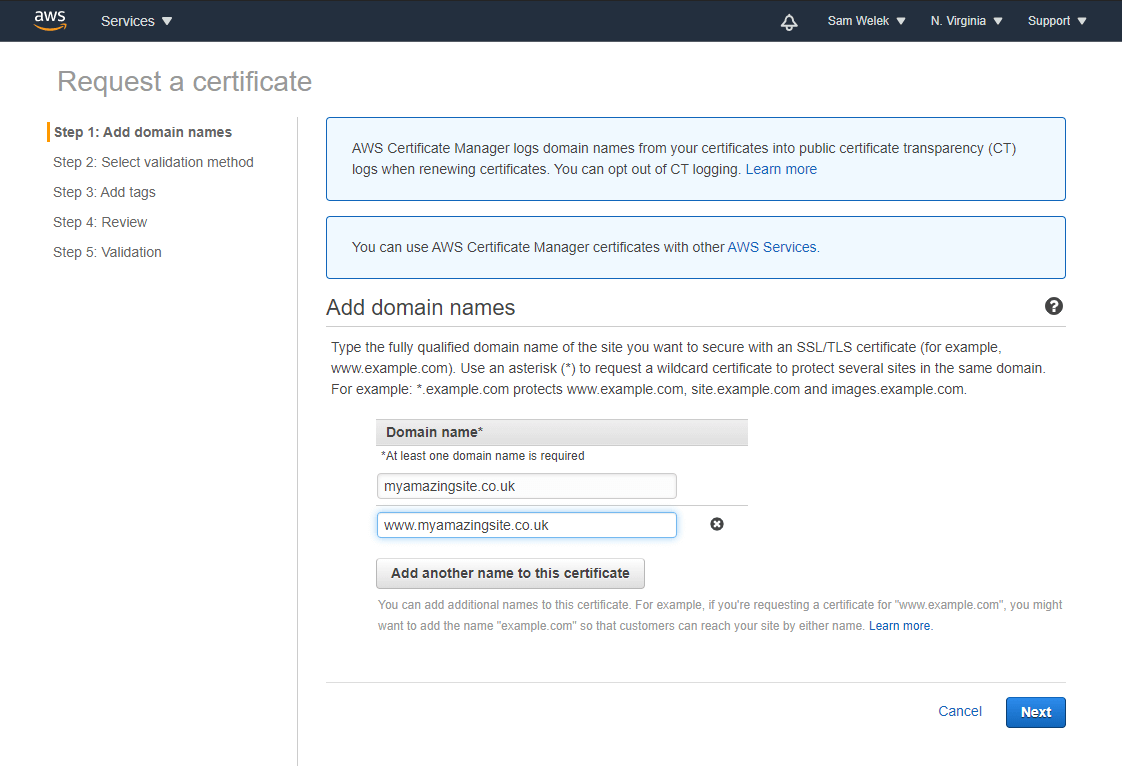
I prefer to use DNS validation as AWS can validate your name for you automatically by creating CNAME records, if you ever want to revoke the certificate you can simply delete these records from within Route53.
Once you complete this you can return to the previous screen and, just as we did with selecting the bucket name, clicking on the Custom SSL Certificate box will reveal a popup dropdown where you can select your newly created certificate.
Finally, towards the bottom of the screen you can optionally specify the Default Root Object as index.html or whichever file should be used to enter your website. Then click Create Distribution - you’re done! Now let’s set up some DNS records!
Using Route53 to Point to your Domain
Finally, once you’ve created the S3 bucket and/or CloudFront Distribution you can set up a DNS record in Route53 to point to your website.
Navigate to the Route53 Management Console by going back to the AWS Management Console and finding the Route53 option or by searching for Route53 on the search bar just as we did in the previous sections.
Next click on Hosted Zones from the left-hand menu and click on the entry that matches the domain name you want to host your website on.
From there, click on Create Record and then click the Simple Routing option as seen below:
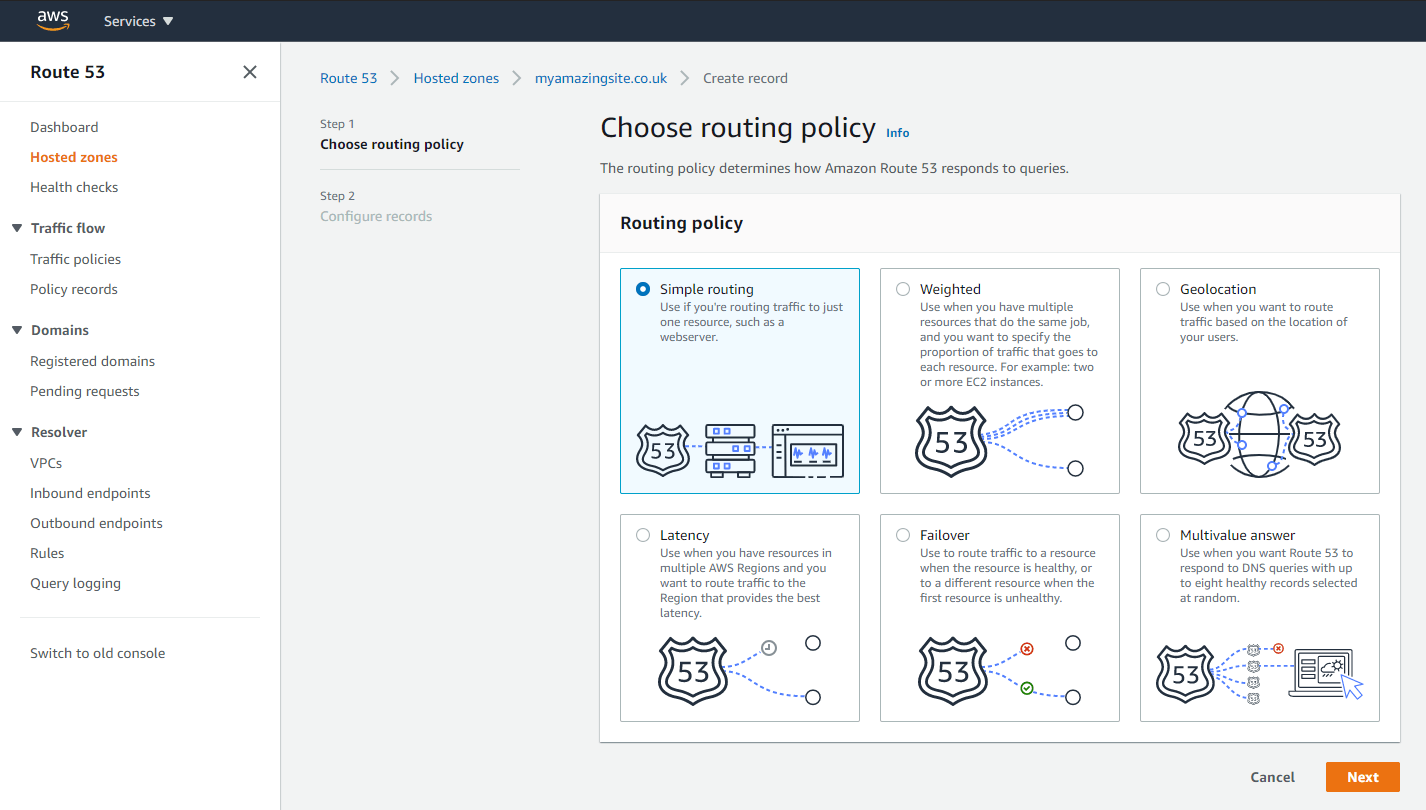
Next, we need to create an A record linking your website to your domain name:
Hosting with S3
If you’re hosting with S3 then you’ll need to select the S3 bucket we created earlier, by going through the options (and ensuring you’ve selected the same region you created your S3 bucket in from earlier):
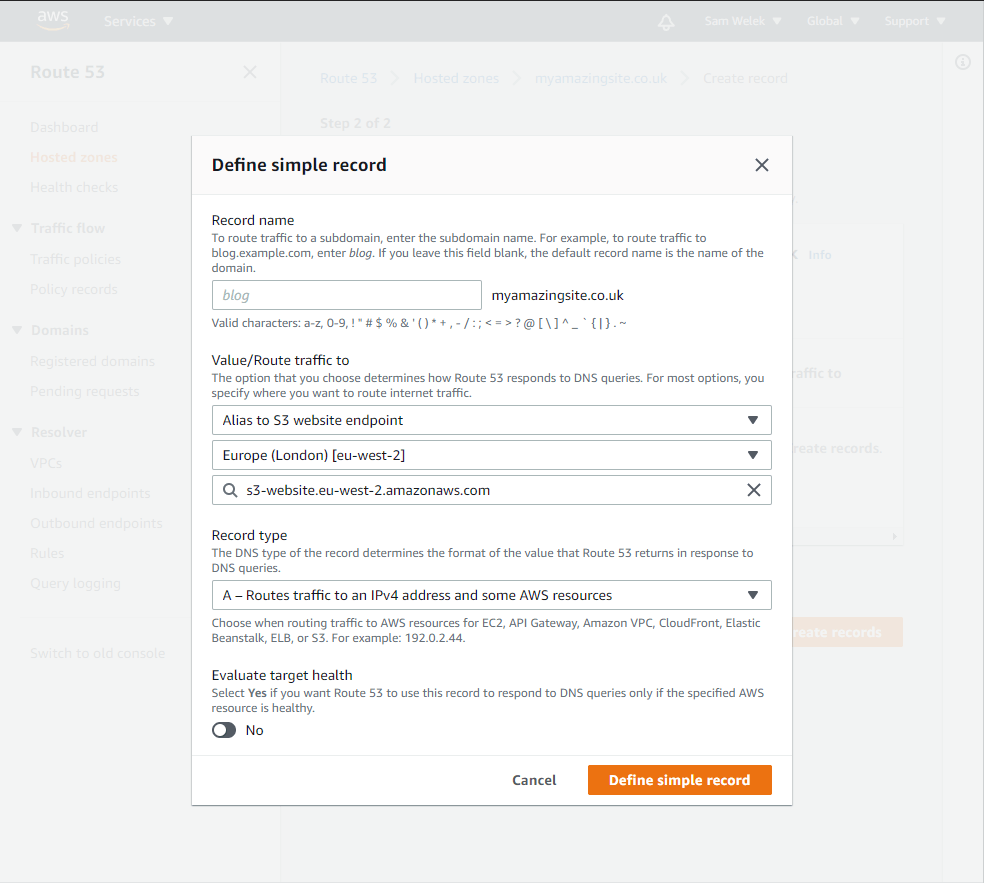
When you’re done, click Define simple record - Now let’s set up GitHub ![]()
Hosting with CloudFront
If you’re hosting with CloudFront then you’ll need to select the CloudFront distribution we created earlier, by going through the options as seen below:
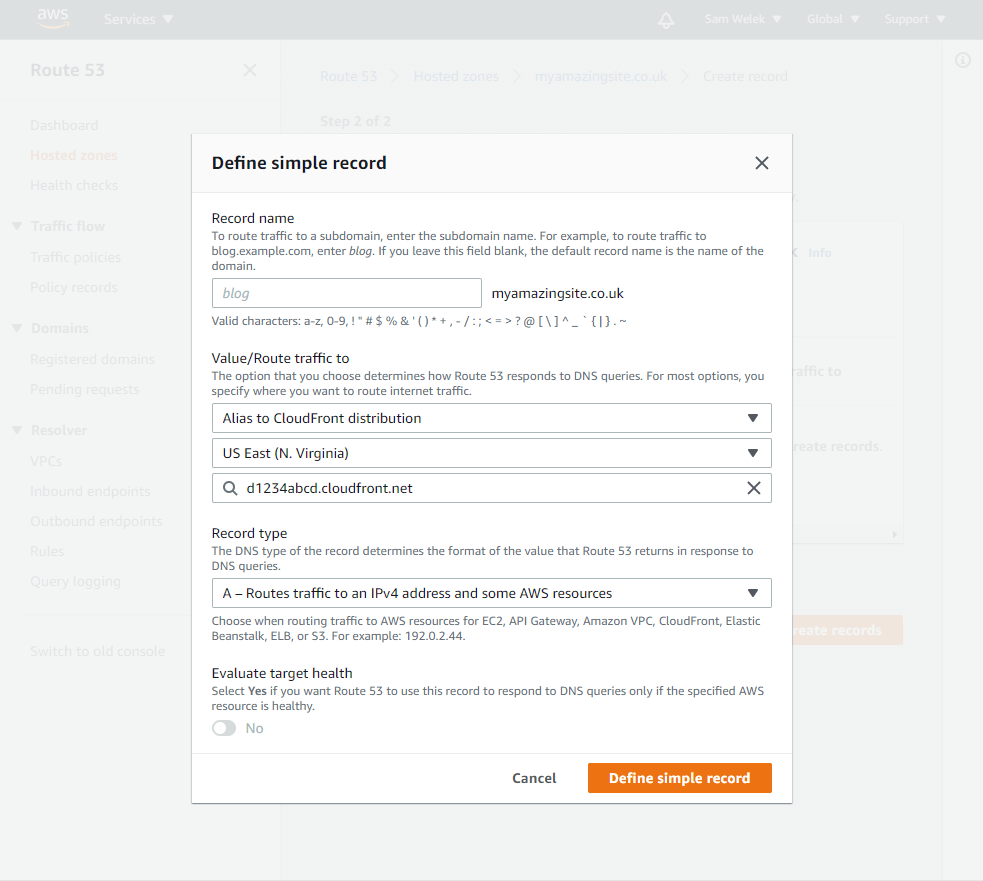
When you’re done, click Define simple record - Now let’s set up GitHub ![]()
Setting up GitHub
Adding Secrets to your GitHub Repository
Now we’ve got your IAM user, CloudFront Distribution and S3 Bucket all set up we can add the following details to your GitHub repository.
| Secret Name | Secret Value |
|---|---|
AWS_ACCESS_KEY_ID |
access_key from AWS IAM |
AWS_SECRET_ACCESS_KEY |
secret_access_key from AWS IAM |
CLOUDFRONT_DIST_ID |
<your_cloudfront_id> the ID of the AWS CloudFront Distribution |
S3_BUCKET |
s3:// followed by your bucket name e.g. s3://myamazingsite.co.uk
|
Note: If you’re not using CloudFront then you can omit the CLOUDFRONT_DIST_ID.
To add these secrets, you’ll need to navigate to the Secrets page for your GitHub repository which can be found under the Settings tab as shown below:
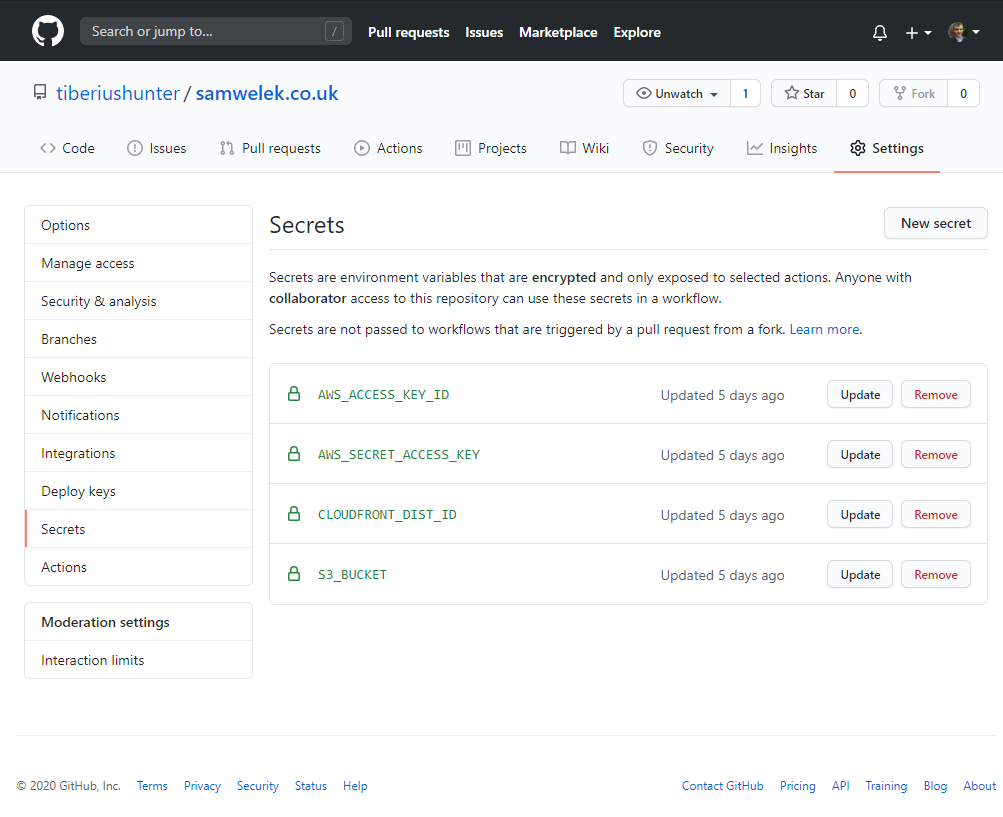
Now we’ve got all the secrets set up we can move on to adding the GitHub Action workflow to your repository. ![]()
Adding GitHub Workflow Configuration
From the root of your repository (locally on your machine) create a new directory called _github/ and then add a directory inside of that called workflows/.
Then create a new file inside the _github/workflows/ directory and paste the below code, when you’re done save this file as main.yml
name: CI
on: [push]
jobs:
  build:
    runs-on: ubuntu-latest
    steps:
    - uses: actions/checkout@v2

    # Remove this step if you're not using Jekyll or modify it
    # if you're building your files with a different system
    - name: Build Jekyll Files
      run: |
        docker run \
        -v $:/srv/jekyll -v $/_site:/srv/jekyll/_site \
        jekyll/builder:latest /bin/bash -c "chmod 777 /srv/jekyll && jekyll build --future --trace"

    - name: Configure AWS Credentials
      uses: aws-actions/configure-aws-credentials@v1
      with:
        aws-access-key-id: ${{ secrets.AWS_ACCESS_KEY_ID }}
        aws-secret-access-key: ${{ secrets.AWS_SECRET_ACCESS_KEY }}
        aws-region: eu-west-2 # Change this to the location of your S3 Bucket

    # Change ./_site/ to the location of your website in your repository,
    # with Jekyll _site/ is the default location of the built files
    - name: Deploy to S3 bucket
      run: aws s3 sync ./_site/ ${{ secrets.S3_BUCKET }} --delete

    # Remove this step if you're not using CloudFront
    - name: Invalidate CloudFront Objects
      run: aws cloudfront create-invalidation --distribution-id ${{ secrets.CLOUDFRONT_DIST_ID }} --path "/*"
Take note of the comments in the code, depending on your exact setup you may need to remove steps or modify the Deploy to S3 bucket step so it pulls your website from the directory it sits in e.g. site/ or dist/ are some common examples where your built website may reside.
If you’re using pure HTML, CSS, and JS then put your website in a directory rather than keeping it all on the root level as otherwise you’ll need to manually configure uploading each file rather than just listing a single directory to deploy.
Once you’ve done this, push this file along with the latest version of your website (if you’ve made any changes) to GitHub.
If you navigate to the Actions tab on your repository you should be able to see that your workflow is currently running! You can drill down to see the current status and hopefully after a minute or so you should see that the workflow finished successfully.
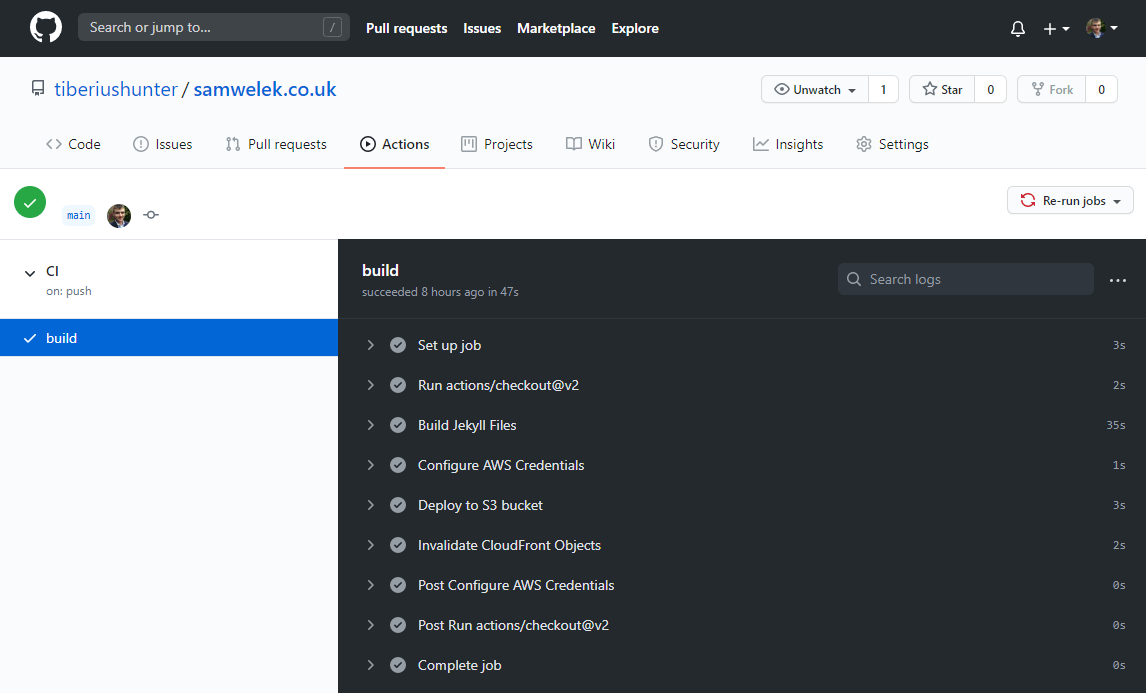
If that is the case then your website has been fully deployed by GitHub and is live on AWS! ![]()
Congratulations ![]() Go to your website URL to see the results!
Go to your website URL to see the results! ![]()